My 5 Easy Steps to Weekly Meal Planning
You don’t need to have gone to culinary school to know that the flavour of a dish is crucial! Talk to any chef and one thing you will hear time and time again is the importance of seasoning your food. When we use the term “seasoning” in the culinary world, we are referring to something that enhances the natural flavours of the food – SALT. Not only does our food not taste right without it, but our bodies need it. Table salt consists of sodium and chloride ions. Our body uses it for auto-regulation of water and electrical signaling in the nervous system.
So now comes the question: how much salt should you use? A good rule of thumb is about 0.75% to 1% salt content by weight. But be mindful personal sensitivity and preference come into play. So for example, if you are making soup. Don’t salt throughout the entire cooking process. Once the soup is complete, weigh the soup and multiply it by 0.0075, and add the resulting amount of salt. This won’t be perfect, but it will give you a great starting point. One thing to be mindful of is whether you will be serving a dish hot or cold. When food is hot, a stronger flavour perception occurs. You will need to add less salt than if serving the same item cold.
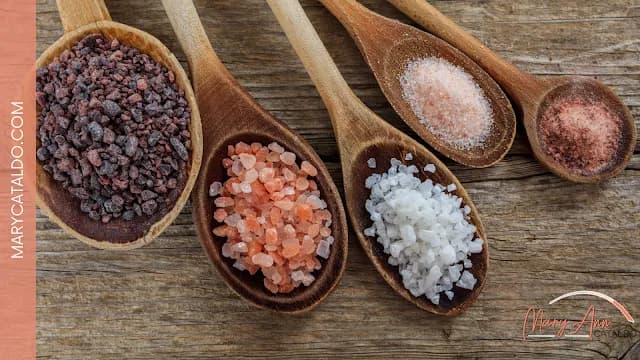
So now that we know the importance salt plays in flavour. But how do you decide which one or ones you should have in your kitchen? Let’s break it down. First off the chemical composition of salt is made up of 39.3% sodium and 60.7% chloride. There is no chemical difference between the various types of salt on the market. So what makes up the price difference? It all comes down to shape, including dense cubes, delicate flakes, and fragile pyramids.
Iodized Salt
Also known as table salt, this is what you will find in most salt shakers. It’s made up of compact, dense crystals which dissolve slowly on your palate. This salt has 1% potassium iodide added to common table salt. This was to guard against goiter, which is a disease caused by an iodine deficiency. However, for anyone living in a first-world county, this is no longer necessary due to well-rounded diets consisting of diverse food choices. Now, one thing about iodine is that in high heat cooking applications, some of the iodine will oxidize or break down, and this gives off an acrid smell and flavour. Ever tasted food that left a metallic taste in the back of your throat? This could be why!
So since this makes iodized salt not the best choice for cooking, this means the only other option is to use it as a finishing salt. Finishing salts are sprinkled on foods right before they are served. But, if you remember, its shape is a dense, cube-like shape, which causes it to bounce off of food instead of adhering to it. Which is the most important trait needed for a finishing salt.
So, if it isn’t good for cooking, and it isn’t good for finishing, what is it good for? ABSOLUTELY NOTHING! This is why you will never find it in my kitchen, and why you should bother keeping it in yours.
Kosher Salt
Kosher salt should actually be called “koshering salt” because it in itself is not kosher, but in actuality, used to kosher meats. This is because of its jagged-crystal structure which sticks to the surface of the meat. Between this and the lack of iodine makes it the number one choice for chefs to use in their kitchens. Now, there are several types/brands of kosher salt, so my advice to you is to pick a brand and stick to it. This will allow you to get a feel for the salt and therefore, get comfortable with knowing how much to add to a dish.
Sea Salts
You need to be mindful that there is no set standard for labeling sea salt. So really, it could come from the sea, or it could come from a salt mine. That being said, there are some good ones on the market that are often used as a finishing salt. One of the more common being:
Fleur de Sel
It has a fragile, pyramid-like shape that when burst open by chewing, releases a wonderful salty sweetness. Because its chemical makeup is the same as kosher salt, just with a much heftier price tag, it is not ideal to be used during the cooking process, but instead used as a finishing salt on things such as fresh fruits, vegetables, salads, meats, and fish.
Himalayan Pink Salt
This is a marketing term created for halite, which is a mineral form of sodium chloride, or rock salt. The pink colour is caused by iron oxide. It has been sold in gourmet markets for years, frankly because it looks cool. Recently, a trend has started by health food influencers claiming that it is more healthy due to its high mineral content. While it’s true that it does contain a lot of trace minerals, in order to reap the health benefits, the amount one would need to consume is completely unattainable. Now, I’m not saying that Himalayan pink salt is bad, I’m saying that if you are buying it for health benefits, you are wasting your money.
So to summarize:
- Iodized salt is useless
- Kosher salt is great for cooking
- Fleur de sel should be used strictly for finishing a dish
- Coloured salts like Himalayan pink salt look cool, but don’t provide much flavour and aren’t an effective mineral supplement
Meal planning doesn’t have to be hard. With just 5 easy steps, see how I plan and execute my meals for the week.
I’m going to share with you the exact process I use every week to plan and execute my meals.
Step 1: Look at your Week
The first thing we need to do is take a look at our weekly calendar. Are there any days where you will be eating out? Are there days where you need something super quick because of an evening activity? Are there days where packing leftovers into your lunch would be beneficial? Remember, when you are first starting out, you don’t have to try and conquer 7 days’ worth of meals. Start small. Maybe one or two days, and then build up from there.
BONUS TIP: I always leave one or two days where I will use up any leftovers that I have. This helps me make sure that I am not wasting any food. Also, when looking at your week, pick one day as your planning and grocery shopping day, and another day as your prep day. Some people find it successful to do this all in one day, but for me, I find it easier to break it up into 2 chunks. Do what works best for you!
Step 2: Choose your Meals
Decide on a place you will store recipes. Whether these be physical recipes cut out of magazines, or written out by hand. Or digital copies saved from a website or typed out on your computer. Either way, have one place that is your go-to. Start with 3-5 that you are comfortable with. In order to get comfortable and effective in the kitchen, you need practice. Repeating some of the same recipes will help with this. When you are comfortable, start with introducing one or two new ones each week. Now that you have decided which meals you are going to have for the week, start plugging them into the days you will have them. Keep in mind, that leftovers are your friends. Are there certain meals that you can make a double batch and have the leftovers on another day? Look at meals with similar ingredients. Do you have salmon and broccoli down for dinner one night? Is there another recipe that includes broccoli and you can make it another night? Minimizing the number of ingredients is going to help with not getting overwhelmed and will cut down the time it takes you to go shopping.
Step 3: Grocery Shopping
Go through your meal plan and make a list of all of the ingredients you will need. Have a look at what you already have on hand. Take inventory of your pantry, freezer, and fridge. Are there ingredients that you already have that you can use? Once you exclude the items you have already, make a list of the items you will need to purchase.
BONUS TIP: Organize your list according to where you find the items in the store. For example, group all of your fruits and veggies together. Then group all of your meats together. This will save you time having to scroll through your list as you walk down each aisle. It will also prevent you from forgetting anything. Really strapped for time? Use an online/pick-up option. Since the pandemic, most grocery stores allow you to place an order online, select a pick up time, and be able to pick up your groceries without even having to walk into the store. If you are choosing to go in and shop the traditional way, make
sure NOT to do this on an empty stomach. This is the best way to make sure you aren’t buying additional foods you don’t need or quick snack options to eat on the car ride home.
Step 4: Prep Time!
Time to get out the pen and paper. Go through each recipe and write out what you can do ahead of time to eliminate the length of time it will take the night you are making your meal. Some people, they like cooking all of their meals and then just reheating them each day. If this is easiest for you then do your thing! For me, I like to prepare as much as possible without actually completing my meal. For proteins, this could include cutting them into my desired sizes and putting them in containers with marinades. For vegetables, this is all of my chopping. I also like to blanche my vegetables. This is where you cook them for a couple of minutes in boiling water and then immediately transfer them to an ice water bath. What this does is allow the vegetables to cook through to the center. This way when you are ready to make your meal, your vegetables simply need to be roasted or sauteed, allowing for caramelization on the outside to occur, without having to wait until the centers are cooked. Blanching ahead of time not only cuts down on your cooking time during the week but also ensures even cooking. Nobody wants charred vegetables that are raw on the inside. Lastly, for any of your green vegetables, blanching preserves their bright green color. For starches, making your rice or quinoa during your prep means you simply have to reheat it at mealtime.
Step 5: Mealtime Execution
Now we get to the easiest step of all – making your meal. Since all of the “work” has already been done, all you have to do is basically put your meal together. Cook-off your protein. Finish off your vegetables. Reheat your starch. VOILA! Let’s Eat!
Plan your work, and work your plan!
The best way to be successful in the kitchen is to have a plan and then execute what is on your plan. The more practice you get, the quicker you will be able to do this. At first, it might seem daunting, but practice makes perfect. Take the extra time on your prep days to make sure everything is ready to go, which means that during the week, you aren’t spending hours making a meal, especially after a long day at the office!